How To Embed A Google Virtual Tour On Your WordPress Website?
If you have a Google Virtual Tour, you’ll probably want to use it to its full potential. Google Virtual Tours are one of the most powerful marketing tools that help businesses reach more consumers online. The virtual tour shows where your business is located and what your business looks like inside. As the Google virtual tour is interactive, the viewer can move through your business the same way a person would on an actual visit. To fully benefit from your 360° virtual tour, you need to use different marketing channels to showcase your business.
An important channel is embedding the virtual tour on your business website pages, such as the Photo Gallery, About Us, or Contact Us page. This is an excellent way for potential customers to get a quick tour of your business and its location without leaving your website. This guide shows you how to embed a Google virtual tour into your WordPress website in a few easy steps.
Step 1: Open Google Maps On Your Computer
To embed your business virtual tour to your website, you need to open Google Maps on your computer. Type Google Maps on your browser, and the first link at the top of your results, should be the Google Maps link. Click the link to open Google Maps. Note: Your business virtual tour can be seen on different Google channels, such as Google Search, Google Maps, and Google Street View. However, when writing this, the code required to embed a Google virtual tour to a website can only be generated by Google Maps.
Step 2: Type Business Name & Click Search
Type the business name on the Google Maps search box and click to open the business listing. If your Google search returns multiple results, make sure you select the correct business listing.
Step 3: Navigate To Business Photos
Once on your business listing page, there are a few different ways to navigate and find the virtual tour. The easiest way is to click on the business cover photo, which will take you to the business listing photos directory.

Step 4: Select – Street View & 360°
The menu on the top left corner of the page allows users to group photos by categories. Scroll right on the menu to see all options and click on the Street View & 360° tab.
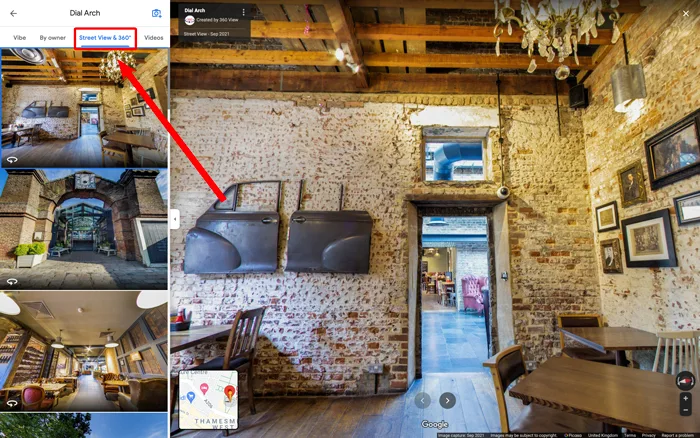
Step 5: Find A Virtual Tour Starting Point
The advantage of embedding a Google virtual tour in your website is that you can choose a starting point within the virtual tour from which the tour will begin. We highly recommend you start the virtual tour showcasing the entrance of your business or an area that looks very good and represents the business well. To select the starting point, navigate through your 360 panoramas and choose the location you want to start with. Rotate the 360 Panorama left, right, up and down, until you are happy with the view perspective you are seeing.
Step 6: Generate HTML Code To Embed On The Website.
Next to your business name, on the top left corner of your 360° panorama, there are three dots. Click on the dots to see more options and select Share or embed image.
Step 7: Copy HTML Code
Now click on Embed a map to see the preview of the image selected before. Here you have another chance to see the final view perspective and make any changes if necessary before you Copy HTML. Remember, this view will appear on your website, and every time a user engages with the virtual tour will always start from the same viewpoint.

Step 8: Log In To Your Website And Paste The Code
Log in to your website and paste the Embed code. That’s all you need to do for your customers or users to be able to explore your Google virtual tour directly on your website. If you have any questions or want to make a booking with one of our Google trusted photographers to create your virtual tour contact us now. If you want to learn more about topics related to embed a Google Virtual Tour on your WordPress website, head over to our resources page for more information about Google Virtual Tours, Google Street View, Google Business Listings, Google Maps View, and Google Business View.
Frequently Asked Questions
How do I embed a Google virtual tour on WordPress?
Copy the iframe embed code from your Google Maps listing or Matterport account, then paste it into a Custom HTML block in the WordPress editor. The tour will display directly on your page.
Does embedding a virtual tour slow down my website?
Virtual tours load asynchronously and have minimal impact on page speed. The iframe loads after your main content, so it does not affect your core web vitals or initial page render time.
Can I control the size of an embedded virtual tour?
Yes. You can adjust the width and height attributes in the iframe code to match your page layout. Responsive settings ensure the tour adapts to different screen sizes automatically.
Does an embedded tour help SEO?
Embedding a virtual tour increases time on page and reduces bounce rate, both of which are positive engagement signals for search engines. Combined with proper schema markup, it strengthens your page relevance.
Can I embed a tour on other platforms besides WordPress?
Yes. The iframe embed code works on Squarespace, Wix, Shopify, and any platform that supports HTML. The process is similar across all content management systems.
Do I need a plugin to embed a virtual tour on WordPress?
No plugin is required. WordPress natively supports iframe embeds through the Custom HTML block. Simply paste the embed code and publish your page.